Showing posts with label Equipment Corner. Show all posts

Wednesday, December 17, 2014

Pan Goop - Copycat 'Cake Release'

This is the best, easiest, quickest, cheapest gift for the baker in your life.
It's called "pan goop." I found it on another baking blog when I ran out of my favorite, Wilton's Cake Release, and I needed something to grease my cake pans with.

This stuff is a-maz-ing! It works perfectly, and it's SO easy and cheap to make.

What You Need:
1 cup shortening
1 cup vegetable oil
1 cup flour

Monday, June 10, 2013

Donuts for Dads Week

This week on the blog, I'm going to feature a number of different homemade doughnut (or donut) recipes... as well as some tricks and tips to make many flavors quickly and easily.

Now, I admit that I am a raised or yeast donut girl at the donut store, but those are so putsy to make, and in the morning, for breakfast, I do not want to have to do that much work. So, I will be focusing on cake donuts. They're easier, faster, and don't always have to be fried!

I'm going to start with what you need to get started: the pans and donut makers.

Tuesday, May 28, 2013

Tip for Tuesday- Cleaning Icing Tips

Big decorating projects leave a big mess.
Cleaning out the icing tips can be such a pain, but I've recently learned a relatively easy trick to get the tips really clean. The bonus is that if you're like me, and use the same tips for both buttercream and royal icing, this method cleans the tips well enough that you don't have to worry about grease getting into your royal icing.

I start by using a toothpick to get as much of the icing out of the tip as possible.

Wash the tips in a sink of soapy water, but you don't have to worry too much about getting them 100% clean.

Dump the tips (and couplers) into a pot of water. I often also add a splash of vinegar just for good measure.

Boil the tips for about 5 minutes.

Drain and rinse them with fresh water. Cool and dry the tips before putting them away.

Click the Links Below to See:

More Tips for Tuesday
The Icing Bag Bullet (also makes cleaning easier)

Enter your email address below to receive the latest recipes, tips and ideas in your email inbox:


Delivered by FeedBurner

And don't forget, if you shop at Amazon.com through my link, you support this blog and its contents. Thank you!

Tuesday, January 15, 2013

Tip for Tuesday - Vinegar

I know it's been a while since I've offered a "Tip for Tuesday." Sorry about that.

This one, it's kind of like my Ode to Parchment Paper... it's all of the reasons why you should keep some white vinegar around... and actually use it.

I used to only use vinegar for cleaning. But then I started using it to make my own "soured milk," instead of keeping buttermilk or buttermilk powder around.

Using soured milk makes most of my cakes and cupcakes more fluffy, I think, so you'll find buttermilk as an ingredient for most of those, but you can always substitute soured milk: 1 cup milk + 1 Tbsp. white vinegar.

Tuesday, July 3, 2012

Tip for Tuesday - NEVER Grease AND Flour

Do you want your icing to stay crumb-free? Then never grease AND flour your cake pan.
WHAT?! Every recipe says to grease and flour your pans. Beki, you're crazy, why would I not grease and flour my cake pans??

Well, it's quite simple, really. It's all about the crumbs. If you think about it, grease + flour = crust. So, when you grease AND flour your pan, you are creating a crust of would-be crumbs to spread right in to your icing.

Here's what I do instead:

Wednesday, June 20, 2012

Tip for Tuesday - Ice Pack for Cake Pops

Making cake pops is never exactly easy. But making cake pops on a hot, humid summer day can be downright miserable. These baby boy cake pops I made for a shower last summer show it. See how they're sweating??

My kitchen gets hot. It works out well in the winter when its 25-below outside. But in the summer, even with the a/c cranking... it's a real pain! So, I started using an ice pack for my cake pops last summer. (See it there? Tucked under the cake ball plate?)

Slip an ice pack underneath the plate or pan of cake balls, before you dip them in the candy. It helps keep the cake balls a little cooler, and a little less likely to fall off of the stick. You still want to work with just 5-10 cake balls at a time, but the ice pack help keep those few cooler as well.

An Ice Pack for your cake pops... today's Tip for Tuesday.

Click the Links Below to See:
Twin Boys Baby Shower Cake Pops
How to Make Cake Pops
Other Tip for Tuesday posts

Enter your email address below to receive the latest recipes, tips and ideas in your email inbox:


Delivered by FeedBurner

And don't forget, if you shop at Amazon.com through my link, you support this blog and its contents. Thank you!

Tuesday, June 12, 2012

Tip for Tuesday - Crumb Cup

What's so special about this glass? It keeps crumbs out of my cakes.

That's right! Want to keep your cake from picking up crumbs? Just keep a "crumb cup" nearby. I prefer pint glasses because they're heavy-bottomed, so they don't fall over when you load a bunch of icing on the side, or when you stick the spatula inside of it.

When you find a crumb in your icing, or on your spatula, just wipe it into the crumb cup. Why not wipe it on to the side of your icing bowl? Because you forget. You forget that that blob was the crummy blob, and that blob was the non-crummy blob.(And everyone has a crummy blob now and again!)

The Crumb Cup-- today's Tip for Tuesday.

Click the Links Below to See:
How to Ice a Cake
Basic Cake Decorating Ideas, Tips & Tricks

Enter your email address below to receive the latest recipes, tips and ideas in your email inbox:


Delivered by FeedBurner

And don't forget, if you shop at Amazon.com through my link, you support this blog and its contents. Thank you!

Wednesday, June 6, 2012

Ode to Parchment Paper

So, I know this is a really weird thing to write a blog post about, but I was trying to think about things that I use just about every time I bake... things I can't live without... and an ode to my oven will come someday... but I'll have to clean it first so that I can take a picture of it!

I landed on parchment paper.
I'm always surprised when friends or students don't know what parchment paper is, or how it's different than waxed paper. Let me tell you, my friends, it is one of those staples that I now couldn't bake without!
(And, no, I did not contact the parchment paper people to get them to pay me for this post, but perhaps I should have. One day maybe I will get paid to post something... just not today.)

Without Further Ado...
What Do You Use Parchment Paper for?

Friday, May 11, 2012

GIVEAWAY! Wilton Ultimate Trim-N-Turn Caddy (CLOSED)

Congratulations #17!! Stacy M. You win the carrier!!
Thank you to all who took the time to enter!!

Think this is just an ordinary cake carrier?? Oh no! I am so excited about this. I just got it from the FedEx man today, and I'm so excited about it, that I'm giving one away to one of you lucky people!

So, this "Ultimate Trim-N-Turn Caddy" is three awesome decorating 'must-haves' in one:

- It's a cake carrier.

- It's a raised TURNTABLE!! (That's right! It turns! And clicks sturdily into place!)

- It's a removable cake plate. (Yes, it's plastic, but still super cute!)
And yes, I realize it's May, and I'm showing you a fall cake on it, but work with me! I was excited! And it's the only fake cake I have decorated around here.

It would be PERFECT to bring your cakes to and from the next cake decorating class you take with me! (What? Not subtle enough for you?!)


Alrighty! Here's your how to enter and the fine print:
You have three chances to enter. ALL ENTRIES MUST BE MADE IN SEPARATE COMMENTS ON THIS POST ONLY.

#1- Leave me a comment about your favorite birthday cake ever, whether you made it, Mom made it, you had it at the coolest birthday party ever, whatever.

#2- Let me know that you get my emails, or "like" me on Facebook, or are a "follower" of the blog.

#3- Share or link to this post on Facebook, Twitter, Pinterest (or all three), and let me know that you did so.

The Info:
This giveaway will be open until 6:00 am (Central Time) Wednesday, May 16, 2012.
I'm sorry, but it is only open to those U.S. Residents (because other countries have too many rules about giveaways) who are 18 years-old or older.
You must put your name (and email address) in your comments. I can't trace anonymous comments.
I will announce the winner - chosen by a 5-year-old pulling a number out of a hat - by noon the same day.

The Fine Print:
I bought this carrier myself, with my own money. No one gave me anything for this post.
The approximate retail value of the caddy is $69.99.

*Note: I can't respond to comments left so that I don't throw off the numbers. And it may sometimes take a while for your comments to appear. I promise to moderate them as quickly as possible.

Enter your email address below to receive the latest recipes, tips and ideas in your email inbox:


Delivered by FeedBurner

If you shop at Amazon.com through my link, you support this blog and its contents. Thank you!
Click Here to Buy it from Amazon - if you don't win.

Wednesday, February 22, 2012

Cake Decorating Kit Giveaway - CLOSED

How Would You Like to Win This?!  
I'm Sorry, but THIS CONTEST IS NOW CLOSED.

Wilton's 50-piece Cake Decorating Kit... plus piece 51, a Cake Leveler.
This is the kit that started me on this whole cake decorating road. I got mine about 12 years ago when I took my first Wilton class.

This week I hit a milestone with the blog. To thank you, I am giving away this decorating kit. You can't see a lot of the contents because they're all wrapped on the bottom of that tray.


So, here's a photo and description of the kit from Wilton's website:
Standard Round Tips #2, 3, 5, 7, 12; Standard Open Star Tips #16, 18, 21, 32; Standard Basketweave Tip #47; Standard Leaf Tip #67; Standard Petal Tips #101, 103, 104; Drop Flower Tips #133, 225; Multi-Opening Tip #233; Leaf Tip #352; Tip #2004 (2D), No. 7 Flower Nail; 18 Disposable Bags; one 10 in. Soft Touch Bag; Tip Brush; Decorator Brush; two Standard Couplers; 8 in. Angled Comfort Grip Spatula; four .5 oz. Icing Colors: Lemon Yellow, Christmas Red, Royal Blue, Leaf Green; Practice Board; New Cake Decorating Beginner's Guide.

... plus the cake leveler.

How to Enter:
You have three chances to enter. ALL ENTRIES MUST BE MADE IN SEPARATE COMMENTS ON THIS POST ONLY.

 #1- Leave me a comment telling me either what recipe/technique you've tried and liked or what you'd like to see me write a post about.

#2- Let me know that you get my emails, or "like" me on Facebook, or are a "follower" of the blog.

#3- Share or link to this post on either Facebook or Twitter, and let me know that you did so.

The Info:
This giveaway will be open until midnight (12:00 am Central Time) Monday, February 27, 2012.
I'm sorry, but it is only open to U.S. Residents (because other countries have too many rules about giveaways).
You must put your name in your comments. I can't trace anonymous comments.
I will announce the winner - chosen by a 5-year-old pulling a number out of a hat - by noon the same day.

The Fine Print:
I bought this kit myself, with my own money. No one gave me anything for this post.
The approximate retail value of the kit and leveler is $65.
*Note: I can't respond to comments left so that I don't throw off the numbers. And it may sometimes take a while for your comments to appear. I promise to moderate them as quickly as possible.

Enter your email address below to receive the latest recipes, tips and ideas in your email inbox:


Delivered by FeedBurner

If you shop at Amazon.com through my link, you support this blog and its contents. Thank you!

Wednesday, January 4, 2012

What Does THAT Do?! -- Cake Leveler

If you follow this blog, you've seen me use it a zillion times...
My Cake Leveler

This $5-6 gadget, which you can buy at your local craft store or cake supply store, is awesome, and worth every penny.

You use a cake leveler to level off the dome on the top of the cake - as seen in the pumpkin cake photo above.

Or to add layers to cakes/tortes as seen in this vanilla-chocolate cake.

Do you have an idea for "What Does THAT Do?!" Send me a photo or a description, and I'll try to find out for you.

Click the Links Below to See:
Other What Does That Do?! Posts

Get the latest ideas from Beki Cook's Cake Blog.  
Click Here to Sign Up on the Email List.

Saturday, December 17, 2011

The Cookie Plate

You know those beautiful pictures of dessert tables you find on all of the baking blogs? The ones where everything is matched by color and they're on assorted heights of plates and there are perfectly matched decorations to go along with them?

That is SO not my life. Do I wish it were? Sure. But it's just not.
In my life, I have...
The Cookie Plate. This means Christmas to me.
It's a little bit of this, a little bit of that. It doesn't match anything. And I LOVE IT!

Monday, December 5, 2011

What?! Your Freezer Doesn't Look Like This?

And Why Not?!

Okay, my freezer doesn't usually have 9 cakes and 2-3 dozen cupcakes in it. (Not to mention the tucked-back bags full of cake scraps to be used for cake pops...) But I do love my freezer.

I fit this "baking thing" in around many other activities in my life. So, when I have some bad bananas, I bake a banana cake (top right). I know I'll need it eventually. And when I have too much batter from a cake, cupcakes or whatever, I make cupcakes (far left) or mini cupcakes (top center).

I sometimes bake cakes for friends. When this photo was taken, I had two birthdays in the same week, with a total of 8 cakes to bake. So, some of those cakes were baked ahead of time and frozen.

I highly recommend making use of your own freezer space. When a cake is cooled completely, I wrap it twice in plastic wrap, then set it on a flat plate or on the cooling grid inside the freezer until it's frozen. Once fully frozen, you can move the cakes around to sit on their sides or whatever you need to make the space work.

It's so nice to know that I have two banana cakes in there right now, one 6", one 8"... just waiting for me to do something with them!

Enter your email address below to receive the latest recipes, tips and ideas in your email inbox:


Delivered by FeedBurner

And don't forget, if you shop at Amazon.com through my link, you support this blog and its contents. Thank you!

Friday, November 25, 2011

How to Store Decorated Cookies

Decorated cookies are precious. They take a lot of time to get just the way you want them. So, storing them the right way is really important to me. Here's what I've found works best for my cookies.

What You Need:
Good, airtight container that seals well
Parchment paper
Totally dried decorated cookies

*Note to explain the scary squirrels: We have an albino squirrel who lives in our yard. His name is Albert. My kids love him, so they needed to make white squirrel cookies to look like Albert. (And no, he didn't tell us his name was Albert, we just call him that.)

Wednesday, October 12, 2011

My Favorite Cake Pan(s)

If you've read more than a handful of my posts on this blog, you can probably already guess what my two favorite cake pans are...

The Wilton 8"x3" round pan...

And the Wilton 6"x2" round pan.

Monday, October 3, 2011

Fondant 101

This week is going to be all about fondant here on the Beki Cook's Cakes Blog.

Fondant is everywhere. ALL of the cake shows use - in my opinion - entirely too much fondant. But if you talk to most people, they have rarely, if ever, eaten the stuff. They talk about peeling it off of the cake before eating it. So, what's the point?! Well, it is beautiful! And if you're at all artistic, it's amazing the kinds of 'sculptures' you can do with it.

This post serves as a kind of introduction to fondant. Although, I will recommend that if you really don't know much about fondant, but would like to get into it, take a real class! It's nice to have someone who knows what they're talking about to answer your questions along the way, and help correct you if there's something you misunderstand. Check out your local craft store, kitchen store or community education catalog. I teach Wilton cake decorating classes at JoAnn Fabrics in Edina, Minnesota. I also teach other cake classes of my own through community education programs around the East Metro of the Twin Cities.

Monday, September 12, 2011

Cake Decorating 101 - What Do You Need?

When you're just starting cake decorating, it can seem really overwhelming to choose what you really need. There are so many different kits, caddies and carriers out there. And they range in price from a few dollars to a few hundred dollars. So, here's what I think every decorator really needs.

The Must-Haves
The nice thing about the “must-haves” is that you can find all of this in the cake decorating aisle of your local craft store.

Friday, August 26, 2011

The Proof is in the Photos - Bake Even Strips

A few weeks ago, I posted about using Wilton's Bake Even Strips, and how they work so well that I never even bother to bake without them... not even to take a comparison shot.
Well, I decided I should do it, even if I didn't want to. So, I took advantage of the fact that I was baking a cake for cake pops, so it didn't matter if it domed, and I baked one with the strip and one without.

Here's the photo comparison:

 I baked two cakes in 9" round pans. SAME cake mix. I even measured 2 1/4 cups into each pan so that they would be completely even. I wrapped the cake on the right with the strip, didn't wrap the one on the left.


Out of the oven, you can see how the one on the right baked more evenly and flat than the one on the left.


And check this out! Look at the difference in the color and "crust" on the sides of the cakes!! That cake on the right is going to be a lot easier to make into cake pops, because it won't have the annoying crusty sides. And it will also be easier to ice and decorate without extra crumbs.
Neither of these cakes ended up with a big dome, but the one baked with the strip is still a little flatter than the other.

*Note: I'm not paid by anyone here. I'm just sharing what works for me. (Though I do teach Wilton Cake Decorating Classes.)

Wednesday, August 17, 2011

What Does THAT Do?! - Bake-Even Strips

You know how your cake comes out of the oven with that annoying dome in the middle? You know how to ice your cake and make it look all smooth and stuff you have to level off that dome? You know how it sucks to lose that much height on your cake, and you're left with a squatty-looking cake? Problem solved!

Let me introduce you to Bake Even Strips. They're from Wilton, and I have used them for years. These save you a lot of time and a lot of cake!

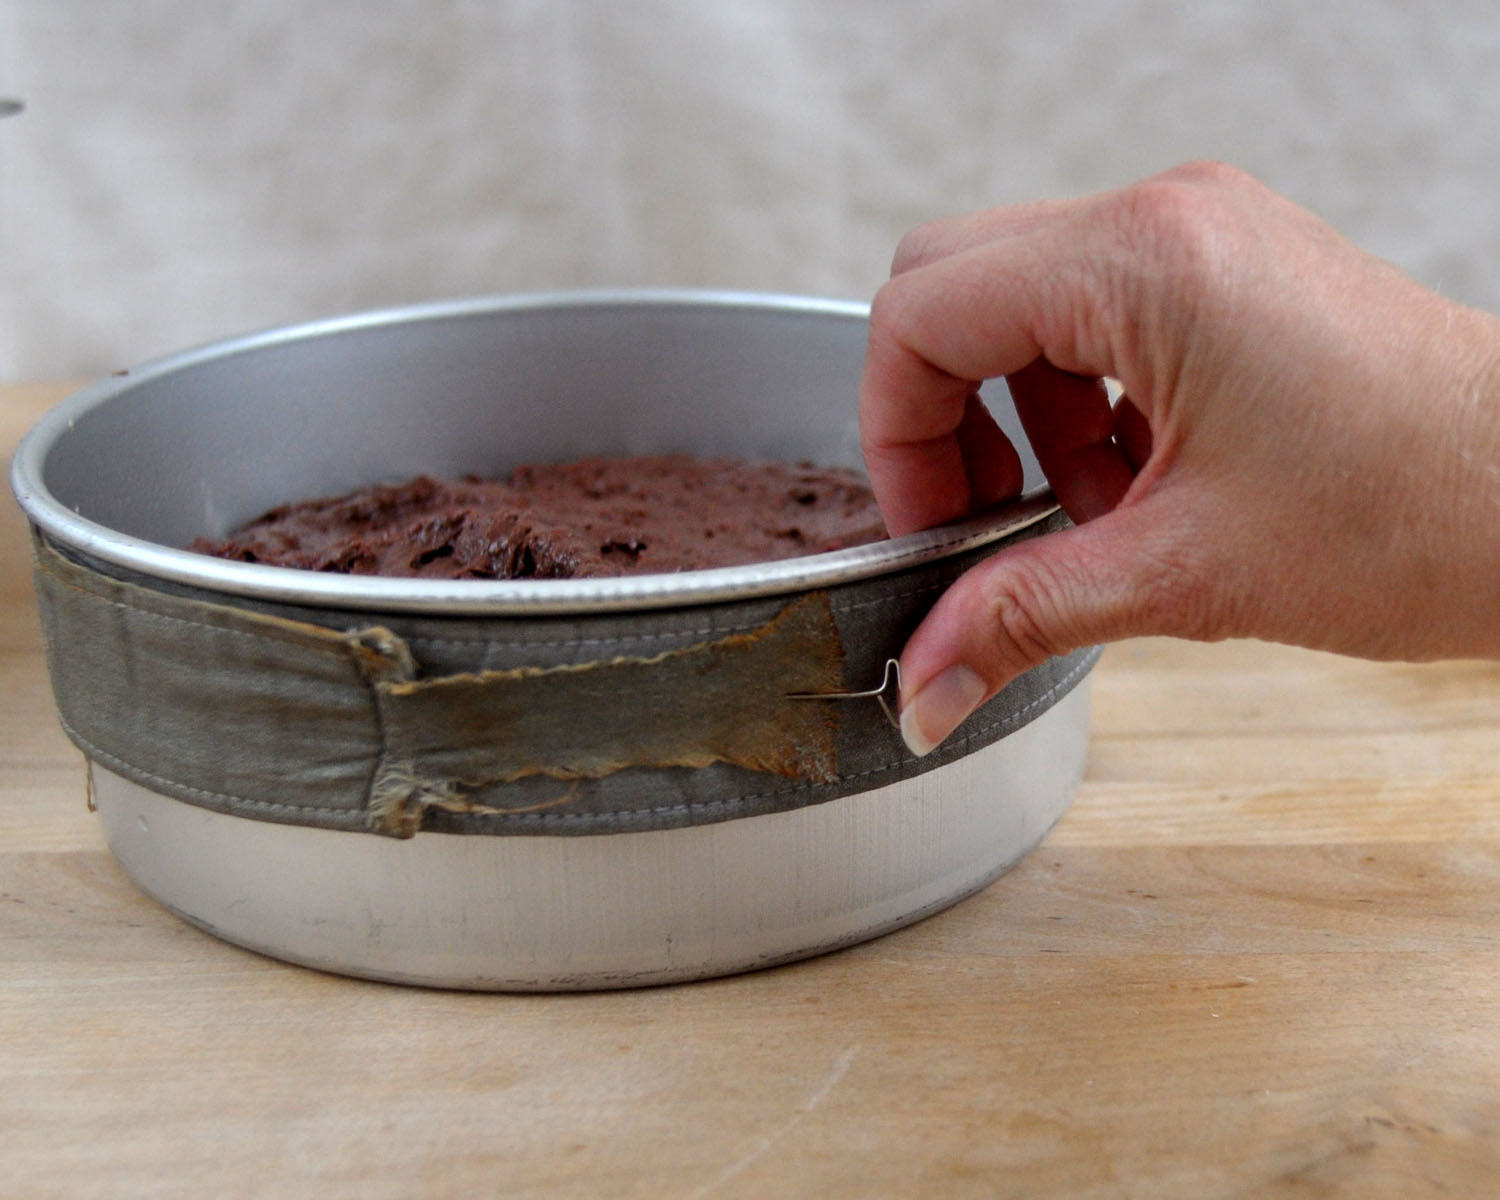
Here's how they work: You soak the strips in ice water for 15 minutes (or so) to get them cold and wet. You then wrap them around the outside of the cake pan and use the pin to keep them tight.
(Note: I got these a dozen years ago, that's why they look so... loved. The newer ones don't have this little extra flap of fabric, so you just pin it right through the other end.)

Occasionally, you may need to add an extra few minutes to bake your cake, but they keep it nice and level. Why? Because they keep the outside of the pan cool. See, your cake domes in the middle because the outside cooks faster than the inside.

I always remove the strips from the pan as soon as I take the cake out of the oven-- to allow the sides to cool better.
Don't mind that this cake is kind of lumpy. It's a chocolate-covered cherry cake, so it's supposed to look like that.

And this is what the cake looks like when baked with the Bake Even Strip.


Click the link for the photos comparing cake baked with and without the Bake Even Strips.

Do you have an idea for "What Does THAT Do?!" Send me a photo or a description, and I'll try to find out for you.

Click the Links Below to See:
More What Does That Do?! Ideas
Other Basic Cake Decorating Tips & Tricks

Get the latest ideas from Beki Cook's Cake Blog.  
Click Here to Sign Up on the Email List.